Sometimes it bothers of using multiple email accounts specially when you have used different email addresses at different places for sign-up or as a contact. But, Gmail lets you take control of multiple Gmail accounts by auto-forwarding of incoming mails from different Gmail accounts to one centralized email account (no matter it is a Gmail account or any other). But, using Gmail as the forwarding email address gives you more flexibility, because you can use Gmail to send mails from different email addresses by displaying any of your email address as sender in the sent from field to recipients.
Gmail provides all these features without any charges while some other major email hosts charge for these feature to their users. You need to add forwarding email address into Gmail account you want to forward emails from and thereafter, you’ll no longer need to login that Gmail accounts for receiving, sending or replying to mails from that Gmail account. It’s a one time process to add forwarding email address and here is the step-by-step process.
1. Login to your Gmail account from which you want to auto-forward incoming mails. Now go to email settings by clicking on the gear icon at the upper right corner of inbox.
2. Select Forwarding and POP/IMAP tab on settings page and the first option in the tab is Forwarding.
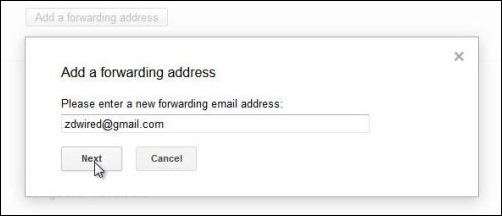
3. Click on Add a forwarding address and enter the forwarding address in the pop box followed by Next button. It will ask you to confirm the email address, just click Proceed. And right that an email has been sent to forwarding email address with the confirmation code.
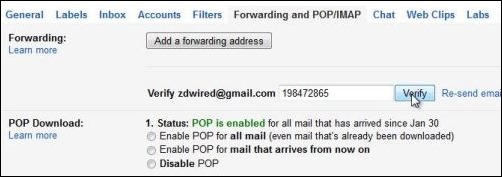
4. Login to your forwarding email account that you have entered in the previous step and check for the mail with the confirmation code. Copy the confirmation code from mail and head back to previous step and enter that confirmation code in the asked field and click verify.
Now you have successfully added and verified your forwarding email address. Last step is to enable forwarding to that email address by selecting “Forward a copy of incoming mail to whateveremail@hostname.com” to auto-forward mails to forwarding email address. Save changes from the bottom of the settings.
Now on, all incoming mails in that particular Gmail account will be auto-forwarded to added forwarding email address. Check out, how to send or reply from Gmail account by displaying any of your email address as the sender in the sent from field to recipients here.


Comments